Large PDFs slow down workflows, clog inboxes, and frustrate everyone on the other end of a file share. The good news: with the right PDF compression techniques, you can shrink files dramatically without turning crisp documents into pixelated messes.
Below is a practical, human-friendly guide to compressing PDFs effectively—whether you’re emailing a proposal, uploading to a portal with strict size limits, or just trying to keep your cloud storage tidy.
Why PDF Compression Matters in Real Workflows
Before diving into how-tos, it helps to understand why this matters beyond “smaller is better.”
- Email limits: Many mail servers cap attachments at 10–25 MB. A 40 MB brochure simply won’t send.
- Upload restrictions: Job portals, grant systems, and client portals often enforce strict file size limits.
- Faster sharing: Smaller files upload and download faster, especially on mobile or slower connections.
- Better UX: Colleagues and clients are more likely to open and read a lightweight PDF than a huge one that takes forever to load.
Effective PDF compression isn’t just about saving space—it’s about removing friction from everyday document sharing.
What Actually Makes PDFs So Big?
Knowing where the bulk comes from helps you choose the right compression strategy.
Common size culprits include:
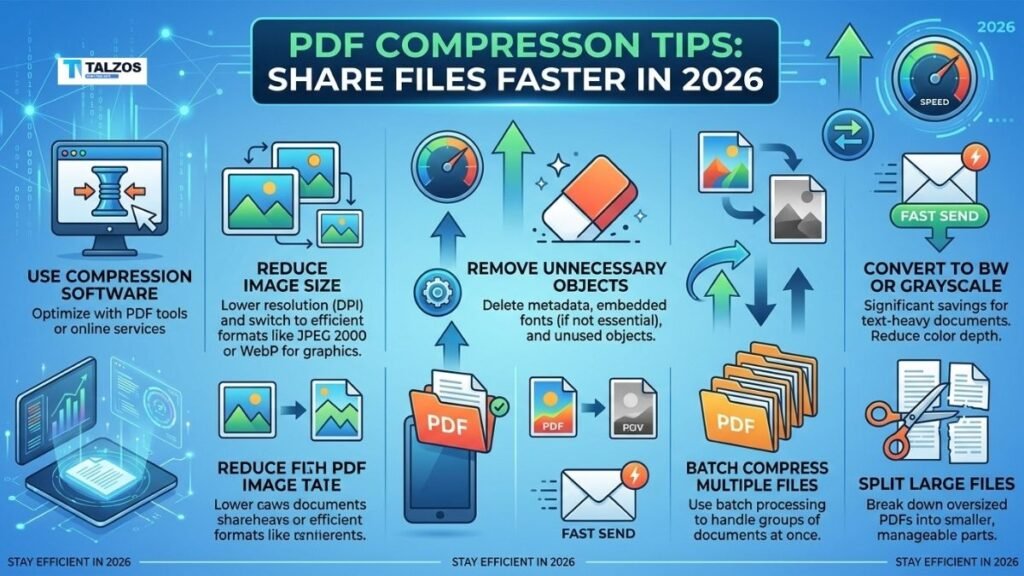
- High-resolution images: Scanned pages, photos, and screenshots embedded at print-ready resolutions (300–600 DPI) can dominate file size.
- Embedded fonts: Full font sets, especially for multiple languages or custom fonts, add up quickly.
- Metadata and hidden objects: Revision history, annotations, form fields, layers, and unused objects bloat files without adding visible value.
- Inefficient exports: Saving from some apps without optimization can leave redundant data and uncompressed images inside the PDF.
Smart PDF compression targets these elements intelligently instead of just “squashing” everything blindly.
Core PDF Compression Strategies That Work
1. Downsample Images to the Right Resolution
Images are usually the biggest offenders. The trick is to match resolution to purpose:
- Screen viewing / email: 150 DPI is typically enough; most people won’t notice a difference at normal zoom.
- Print-ready documents: 300 DPI is a safe standard for professional printing.
- Archival or high-end print: You may need higher, but this is rare for everyday sharing.
Most PDF compressors let you set a target DPI or choose presets like “web,” “email,” or “print.” Start with a medium setting and inspect the result before committing.
2. Use Smart Image Compression
Beyond resolution, the compression method matters:
- JPEG recompression: Converting embedded images to JPEG at 80–90% quality often yields huge savings with minimal visible loss.
- JPEG2000 or modern codecs: Some tools support more efficient codecs that preserve quality at smaller sizes.
- Grayscale where possible: If color isn’t needed (e.g., internal reports), converting images to grayscale can reduce size further.
The goal is “visually lossless”: the document looks the same to the human eye, even if the underlying data is leaner.
3. Subset and Optimize Fonts
Fonts can quietly inflate your PDF, especially if the file embeds full font families.
- Font subsetting: Keep only the characters actually used in the document instead of the entire font.
- Remove unused fonts: If your PDF has multiple embedded fonts but only uses a few, strip out the rest.
Professional tools like Adobe Acrobat’s PDF Optimizer show you exactly how much space fonts occupy so you can decide what to keep.
4. Remove Unnecessary Pages and Objects
Before compressing, do a quick content audit:
- Delete extra pages: Draft pages, blank pages, or internal notes that don’t need to be shared.
- Flatten forms and annotations: If recipients don’t need to fill fields or see comments, flattening can reduce complexity and size.
- Strip metadata: Remove hidden info like author names, revision history, and application data if privacy or size is a concern.
This “clean first, compress second” approach often yields better results than compression alone.
5. Choose the Right Export or Save Settings
How you create the PDF in the first place has a big impact.
From common apps:
- Microsoft Word: When saving as PDF, choose “Minimum size (publishing online)” instead of “Standard.”
- LibreOffice: In the PDF export dialog, reduce image resolution to around 150 DPI and enable JPEG compression at 80–90%.
- Mac Preview: Use “Export” with the “Reduce File Size” Quartz filter for quick shrinking.
- Adobe Acrobat Pro:
- Quick option:
File > Save As Other > Reduced Size PDF. - Advanced option:
File > Save As Other > Optimized PDFto fine-tune images, fonts, and objects.
Exporting digitally (instead of scanning paper) also keeps files smaller and easier to compress later.
Tools and Methods for PDF Compression
You don’t need to be a tech wizard to compress PDFs. Here are practical options for different workflows.
Online PDF Compressors (Quick & Easy)
Best for: occasional use, no software install, fast results.
Popular options include tools like iLovePDF, SmallPDF, PDFlite, PDFSmart, and others that offer:
- Drag-and-drop interfaces
- Preset compression levels (low/medium/high)
- Immediate download of the compressed file
Tips when using online tools:
- Start with a medium compression level; it often removes 40–60% of file size with no noticeable quality loss.
- Check sensitive documents’ privacy policies; some services process files on their servers.
- Avoid tools that add watermarks on free plans if you need clean, professional output.
Online compressors are ideal for quick PDF compression before emailing or uploading.
Desktop Software (More Control, Better Privacy)
Best for: frequent use, sensitive documents, batch processing.
Examples:
- Adobe Acrobat Pro: Industry standard with granular control via PDF Optimizer, including image downsampling, font subsetting, and object removal.
- PDFGear, PDF24, and similar free tools: Offer compression features with varying levels of control and privacy.
- Built-in OS tools:
- macOS Preview’s “Reduce File Size” export.
- Windows “Print to PDF” with optimized settings in some configurations.
Desktop tools shine when you need consistent settings across many files or want to keep everything on your machine.
Command-Line and Advanced Options
Best for: developers, automation, server-side workflows.
Tools like Ghostscript can compress PDFs via commands such as:
gs -sDEVICE=pdfwrite -dPDFSETTINGS=/ebook -sOutputFile=output.pdf input.pdfPresets like /ebook target screen viewing with good quality and smaller size, while /screen pushes compression further.
This approach is powerful for integrating PDF compression into automated pipelines, but it’s more technical than most everyday users need.
A Simple Step-by-Step PDF Compression Workflow
Here’s a straightforward process you can follow for most documents:
- Audit the file
- Open the PDF and note obvious bloat: extra pages, huge images, scanned sections.
- Remove anything unnecessary before compressing.
- Choose your tool
- For quick jobs: an online compressor with medium settings.
- For sensitive or frequent tasks: desktop software like Acrobat or a trusted free tool.
- Set appropriate compression levels
- Aim for 150 DPI images for screen use; 300 DPI if printing.
- Use medium compression first; inspect before going higher.
- Inspect the result
- Zoom in on photos, charts, logos, and small text.
- Ensure everything is still clear and professional.
- Save and share
- Use a clear filename (e.g.,
Proposal_Compressed.pdf) so recipients know it’s optimized. - Share via email, cloud link, or upload portal as needed.
Repeat this workflow as a standard practice and your file-sharing experience will improve dramatically.
Common Mistakes to Avoid with PDF Compression
Even with good tools, a few missteps can undermine your efforts.
- Over-compressing: Cranking compression to the max can make text fuzzy and images blocky. Start moderate and adjust.
- Ignoring the use case: A file optimized for screen may not be suitable for high-quality print. Match settings to the destination.
- Compressing before cleaning: Removing pages, annotations, and metadata first often yields better results than compressing a bloated file as-is.
- Not testing: Always open the compressed PDF and check critical sections before sending it to a client or uploading it somewhere important.
Thoughtful PDF compression balances size, quality, and purpose instead of just chasing the smallest number.
Tips for Specific Scenarios
Emailing Large Proposals or Reports
- Split very long documents into sections if one file remains too big after compression.
- Use medium compression and 150 DPI images; most clients view proposals on screens, not in print.
- Add a short note: “Compressed for easier download” sets expectations and shows consideration.
Uploading to Portals with Strict Limits
- Check the portal’s maximum file size before compressing.
- If one pass isn’t enough, combine techniques: remove pages, downsample images more aggressively, and then compress.
- Keep a higher-quality version internally; only upload the compressed copy.
Sharing Scanned Documents
- If possible, re-scan at a lower DPI (150–200) for screen use instead of scanning at 600 DPI by default.
- Use OCR-enabled tools that also compress; this keeps text searchable while reducing size.
- For older scans, recompressing with a dedicated tool can still yield significant savings.
Building a Size-Conscious Document Habit
The best PDF compression strategy is preventative: create lean files from the start.
Practical habits:
- Preview before exporting: Check image sizes and page count in your source app.
- Standardize settings: Use consistent “web” or “email” presets for routine documents.
- Educate your team: Share simple guidelines on image resolution, font embedding, and cleanup before export.
- Use cloud optimization: Some platforms automatically compress uploads; leverage these when available.
Over time, these habits reduce the need for heavy-handed compression later and make collaboration smoother.
Final Thoughts: Make PDF Compression Part of Your Workflow
PDF compression isn’t a one-off trick; it’s a small but powerful part of modern document hygiene. By understanding what bloats your files, choosing the right tools, and applying sensible settings, you can share documents that are fast, professional, and easy to handle.
Start with one or two techniques—like downsampling images and removing extra pages—and build from there. Your inbox, your teammates, and your clients will thank you.