
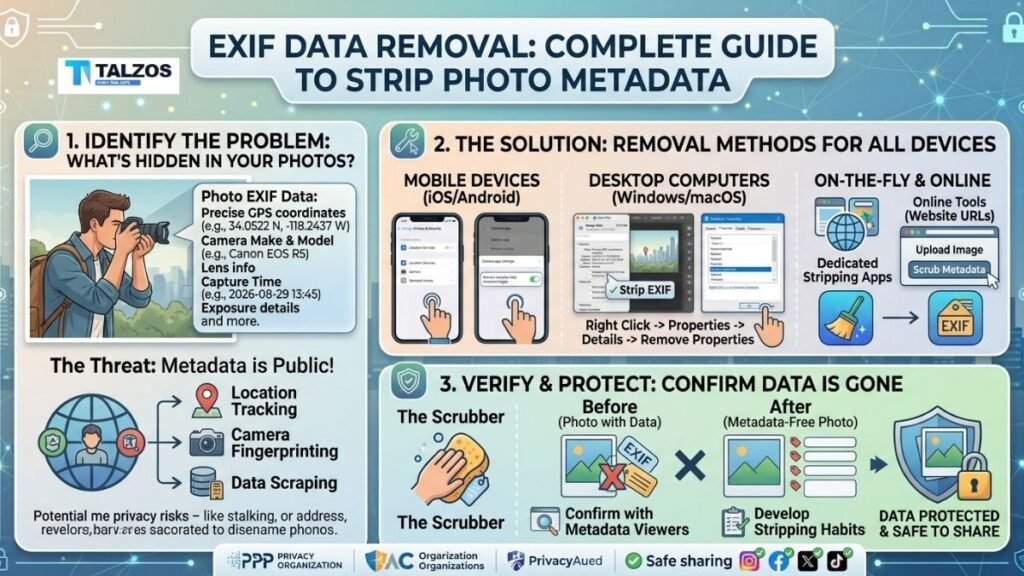
Every photo you take carries hidden information most people never see. That innocent snapshot from your morning coffee run might reveal your exact location, the time you were there, and even the specific device you used. This hidden layer is called EXIF data, and learning how to remove it is one of the simplest yet most powerful privacy habits you can build in 2026.
In this guide, you’ll discover what EXIF data actually is, why you might want to strip it, and exactly how to perform EXIF data removal on every major platform—Windows, macOS, iPhone, Android, and even directly in your browser. Whether you’re a photographer sharing work online, a parent posting family pics, or just someone who values digital privacy, you’ll walk away with practical, step-by-step methods you can use today.
What Is EXIF Data and Why Should You Care?
EXIF stands for Exchangeable Image File Format. It’s a metadata standard that your camera or smartphone automatically embeds into every photo you take. Think of it as a digital receipt attached to your image file, recording details about how, when, and where the photo was captured.
Typical EXIF fields include:
- Camera make and model (e.g., iPhone 15 Pro, Canon EOS R6)
- Lens information and focal length
- Exposure settings (ISO, shutter speed, aperture, white balance)
- Date and time the photo was taken
- GPS coordinates (latitude, longitude, altitude) if location services were enabled
- Device serial numbers and software version
- Editing history and thumbnails in some cases
Most of this information is harmless—or even useful for photographers reviewing their work. But GPS coordinates and timestamps are different. They can pinpoint where you were down to a few meters and reveal patterns about your daily routine. Share enough photos with intact EXIF data, and someone could piece together where you live, work, gym, or send your kids to school.
Studies suggest that up to 87% of smartphone photos still contain location metadata by default. That’s a lot of unintentional oversharing happening every day.
When Should You Remove EXIF Data?
Not every photo needs scrubbing. If you’re printing family albums or sharing images in a private group where everyone trusts each other, leaving EXIF intact is usually fine. But there are several scenarios where EXIF data removal becomes essential:
- Posting on social media or public forums: Platforms like Facebook and Instagram often strip EXIF automatically, but many others (including some messaging apps, forums, and portfolio sites) don’t.
- Selling or licensing photos online: Buyers don’t need your GPS trail, and some marketplaces explicitly require metadata-free uploads.
- Sharing screenshots or images containing sensitive locations: Think your home address on a delivery box, your workplace, or your child’s school.
- Submitting images to competitions, publications, or client work: Many editors prefer clean files without embedded personal data.
- Privacy-conscious sharing in general: If you wouldn’t want a stranger knowing exactly where and when you took a photo, strip the EXIF.
A good rule of thumb: if the photo is going anywhere public or semi-public on the internet, remove EXIF data by default. It’s a small step that significantly reduces your digital footprint.
How to Remove EXIF Data on Windows
Windows 10 and 11 include a built-in tool for basic EXIF data removal. It’s not the most powerful option, but it works well for quick cleanup before sharing.
Step-by-Step: Built-In Windows Method
- Right-click the photo file in File Explorer and select Properties.
- Go to the Details tab.
- At the bottom, click Remove Properties and Personal Information.
- Choose Create a copy with all possible properties removed (this keeps your original intact).
- Click OK and wait for Windows to generate the cleaned copy.
This method removes most standard EXIF fields, including GPS coordinates, timestamps, and device info. However, it may leave behind some color profiles or maker notes depending on the file type.
Advanced Option: ExifTool for Power Users
For complete control, install ExifTool (a free command-line utility). With a single command, you can strip all metadata:
exiftool -all= -overwrite_original photo.jpgOr remove only GPS data while keeping camera settings:
exiftool -gps:all= photo.jpgExifTool works on Windows, macOS, and Linux, and supports virtually every image format.
How to Remove EXIF Data on macOS
macOS offers a couple of native options, though they’re more limited than Windows’ built-in remover. For full EXIF data removal, third-party tools are recommended.
Built-In Method: Preview App
- Open the photo in Preview.
- Go to Tools > Show Inspector (or press
Cmd+I). - Click the GPS tab (if present) and select Remove Location Info.
- To export a clean copy, go to File > Export, choose JPEG, and save.
Note: This only removes GPS coordinates. Other EXIF fields like camera model and timestamps remain.
Full Removal: ImageOptim or ExifTool
For complete EXIF data removal, use ImageOptim (free, drag-and-drop) or ExifTool via Terminal:
exiftool -all= photo.jpgImageOptim also optimizes file size, making it a great choice for web uploads.
How to Remove EXIF Data on iPhone and iPad
iOS doesn’t offer a one-tap “remove all EXIF” button, but you can strip location data per-share or disable geotagging at the source.
Per-Share Location Removal
- Open the Photos app and select the image(s).
- Tap the Share button.
- At the top, tap Options.
- Toggle Location off (and All Photos Data if available).
- Share or save the cleaned copy.
This method removes GPS coordinates but may retain other metadata depending on the app you’re sharing to.
Disable Geotagging Permanently
To prevent location data from being added in the first place:
- Go to Settings > Privacy & Security > Location Services.
- Scroll to Camera and set it to Never.
Now your photos won’t include GPS coordinates at all.
Third-Party Apps
Apps like Scrambled Exif (available via sideloading or alternative app stores) or Metapho offer one-tap EXIF data removal for all fields, not just location.
How to Remove EXIF Data on Android
Android varies by manufacturer, but most devices offer similar options.
Built-In Gallery Method (Samsung and Others)
- Open the photo in your Gallery app.
- Tap Details (or the three-dot menu > Details).
- Tap Edit and remove the location entry if present.
- Save the changes.
Some Samsung devices also have a Location tags toggle in the Camera app settings. Turn it off to prevent future geotagging.
Dedicated Apps: Scrambled Exif
For complete EXIF data removal, install Scrambled Exif (free, open-source, available on F-Droid). It strips all metadata before sharing:
- Install Scrambled Exif.
- When sharing a photo, choose Scrambled Exif as the intermediary.
- The app removes all EXIF fields and passes the clean image to your chosen app.
This is the most reliable method for Android users who share photos frequently.
Online EXIF Data Removal Tools (No Installation Required)
If you don’t want to install apps or use command-line tools, browser-based EXIF removers work directly on your device without uploading photos to a server.
Recommended: Privacy-Focused Browser Tools
Tools like FormatDrop, BenriLab EXIF Remove, or PrivacyPix process images locally in your browser:
- Visit the tool’s website.
- Upload your photo(s).
- Review the detected metadata (GPS, camera, timestamps).
- Click Remove Metadata or Strip EXIF.
- Download the cleaned image.
Because processing happens locally, your photos never leave your device—ideal for sensitive images.
Avoid generic “online EXIF remover” sites that require uploading files to their servers unless you trust their privacy policy.
Best Practices for Ongoing EXIF Data Removal
Making EXIF data removal a habit is easier than you think. Here are a few tips to keep your photos private by default:
- Disable geotagging at the source: Turn off location services for your camera app on both iPhone and Android.
- Use a dedicated remover app: Keep Scrambled Exif (Android) or Metapho (iOS) installed for quick cleanup before sharing.
- Batch process before uploading: If you’re posting multiple photos, use ExifTool or ImageOptim to strip metadata from an entire folder at once.
- Check platform policies: Some social networks strip EXIF automatically; others don’t. Assume they don’t unless confirmed.
- Educate family and friends: Share this guide with anyone who posts photos of your kids, home, or daily routine.
Common Myths About EXIF Data Removal
Let’s clear up a few misconceptions:
- “Social media always removes EXIF”: Not true. While Facebook and Instagram do, many platforms (including some messaging apps, forums, and cloud storage links) preserve metadata.
- “Deleting location in Photos app removes all EXIF”: On both iOS and macOS, this only hides or removes GPS coordinates. Other fields like timestamps and device info remain.
- “EXIF removal ruins image quality”: False. Stripping metadata doesn’t affect pixel data. Your photo looks identical—just without the hidden info.
- “Only professionals need to worry about EXIF”: Anyone who shares photos online can inadvertently reveal sensitive location or timing data.
Final Thoughts: Make EXIF Data Removal Part of Your Digital Hygiene
EXIF data removal isn’t about paranoia—it’s about control. You decide what information travels with your photos, not your camera or the apps you use. With the methods outlined above, you can strip GPS coordinates, timestamps, and device info in seconds, whether you’re on Windows, Mac, iPhone, Android, or even just using a browser.
Start small: disable geotagging on your phone, try the built-in remover on your computer, or bookmark a privacy-focused online tool. Over time, EXIF data removal becomes second nature—like locking your door or wearing a seatbelt. And in a world where digital footprints are increasingly permanent, that small habit can make a big difference.
Your photos tell stories. Make sure they tell only the ones you want to share.