Large PDF files can be frustrating. They clog up your inbox, take forever to upload, and sometimes get rejected by websites with strict size limits. The good news? You don’t have to sacrifice clarity to make your documents smaller. With the right approach, you can compress PDF files while keeping text sharp and images clear.
This guide walks you through practical, tested methods to reduce PDF file size without losing quality. Whether you’re on Windows, Mac, or just need a quick online solution, you’ll find a technique that works. Let’s dive in.
Why PDF Files Get So Large
Before jumping into solutions, it helps to understand what makes PDFs bulky in the first place. Most of the time, the culprit is embedded images. High-resolution photos, scanned documents, and screenshots can inflate file size dramatically.
Other factors include:
- Unoptimized fonts: Some PDFs embed entire font families instead of just the characters used.
- Redundant objects: Hidden layers, annotations, or unused elements add unnecessary weight.
- Print-ready settings: PDFs exported for professional printing often keep resolution far higher than needed for screen viewing.
Knowing where the bloat comes from helps you choose the right compression strategy.
Method 1: Use an Online PDF Compressor
For most people, the fastest way to compress PDF files is through a browser-based tool. These services handle the technical heavy lifting while you sit back and wait a few seconds.
How It Works
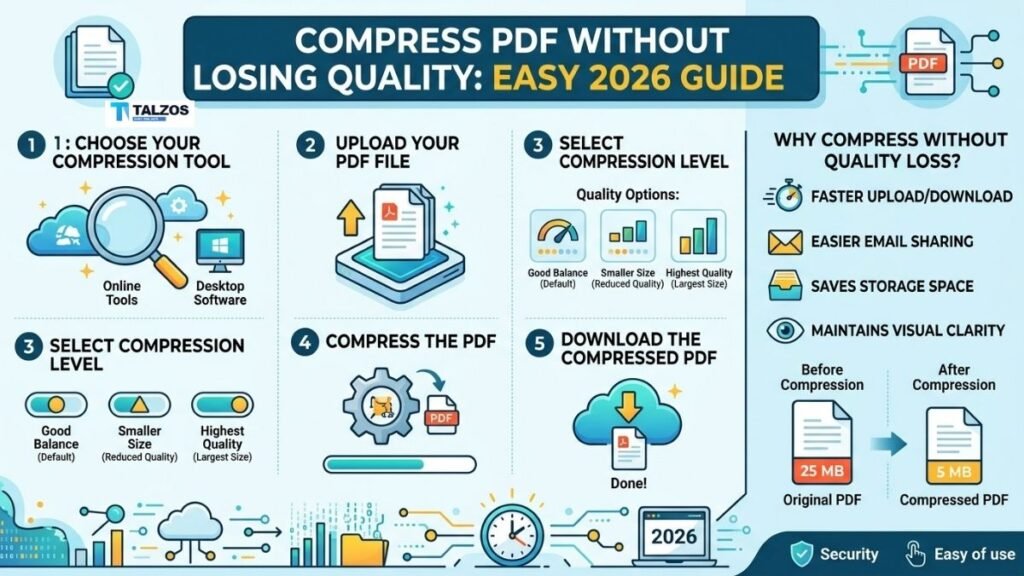
- Upload your PDF: Drag and drop your file into the tool’s upload area.
- Choose compression level: Most tools offer presets like “Low,” “Recommended,” or “Maximum.” Start with the balanced option.
- Download the result: Once processing finishes, save your smaller PDF.
Popular Options in 2026
- iLovePDF: Free, no signup required, and works on mobile browsers.
- Smallpdf: Known for maintaining sharp quality even on stronger settings.
- NeatPDF: Offers lossless compression with a “Low” preset for zero visible quality loss.
- FreePDFConvert: Simple three-step process with reliable results.
These tools typically shrink files by 40–70% without noticeable degradation, making them ideal for email attachments or web uploads.
Method 2: Adobe Acrobat Pro (The Gold Standard)
If you have access to Adobe Acrobat Pro, you’re holding the most powerful PDF compressor available. It gives you granular control over every element in your document.
Step-by-Step Instructions
- Open your PDF in Acrobat Pro.
- Go to File > Save As Other > Reduced Size PDF.
- Choose your compatibility version (newer versions allow better compression).
- Click OK and save the file.
For even more control, use File > Export To > Image or adjust settings under Optimize PDF to downsample images, subset fonts, and remove unused objects.
This method is especially useful for batch processing or when you need to meet specific size requirements without compromising professional quality.
Method 3: Export from the Source Application
Sometimes the best way to compress PDF is to prevent it from getting too large in the first place. If you’re creating the document yourself, adjust export settings before saving.
Microsoft Word (Windows/Mac)
- Click File > Save As.
- Choose PDF as the file type.
- Click Options.
- Under “Optimize for,” select Minimum size (publishing online).
LibreOffice
- Go to File > Export As > Export as PDF.
- In the General tab, reduce image resolution to 150 DPI.
- Switch to JPEG compression at 80–90% quality.
macOS Preview
- Open the PDF in Preview.
- Go to File > Export.
- In the “Quartz Filter” dropdown, select Reduce File Size.
- Save the new version.
These built-in options often produce smaller files than generic PDF exporters because they optimize content during creation rather than after the fact.
Method 4: Print to PDF with Lower Resolution
This workaround works on both Windows and Mac and doesn’t require any special software. It’s particularly effective for PDFs that are already created and can’t be re-exported from the source.
Windows
- Open the PDF in any viewer (Chrome, Edge, Adobe Reader, etc.).
- Press Ctrl+P to open the print dialog.
- Select Microsoft Print to PDF as the printer.
- Click Printer Properties > Advanced.
- Set output resolution to 150 or 300 DPI (600 DPI is overkill for screen reading).
- Print and save the new file.
Mac
- Open the PDF in Preview or any viewer.
- Press Cmd+P.
- In the print dialog, look for the PDF dropdown at the bottom.
- Choose Save as PDF and adjust quality settings if available.
This method essentially “re-rasters” the document at a lower resolution, which can dramatically reduce file size while keeping text readable.
Method 5: Command-Line Tools for Advanced Users
If you’re comfortable with terminal commands, Ghostscript offers powerful compression capabilities for free. It’s a favorite among developers and IT professionals.
Basic Ghostscript Command
gs -sDEVICE=pdfwrite -dPDFSETTINGS=/ebook -sOutputFile=output.pdf input.pdfThe -dPDFSETTINGS flag accepts several options:
- /screen: Lowest quality, smallest size (72 DPI).
- /ebook: Medium quality, good for reading (150 DPI).
- /printer: High quality (300 DPI).
- /prepress: Maximum quality for professional printing.
For most use cases, /ebook strikes the best balance between size and clarity.
Tips to Maximize Compression Without Quality Loss
Beyond choosing the right tool, a few smart practices can help you squeeze out even more savings.
Downsample Images to 150 DPI
Most screens display content at 72–150 DPI. If your PDF contains 300 or 600 DPI images, you’re carrying unnecessary weight. Downsampling to 150 DPI for screen viewing (or 300 DPI for print) can cut file size significantly without visible degradation.
Remove Unnecessary Pages
Before compressing, review your document and delete any pages that aren’t strictly needed. Every extra page adds to the total size, especially if it contains images or complex graphics.
Flatten Forms and Annotations
Interactive form fields, comments, and annotations can bloat file size. If you don’t need these features, flatten them before compression. Most PDF editors offer a “Flatten” or “Print to PDF” option to achieve this.
Export Digitally Instead of Scanning
If you’re creating PDFs from physical documents, scanning at 600 DPI “just in case” creates massive files. For most purposes, 150–200 DPI is sufficient. Save the higher resolution for archival copies, not everyday sharing.
Split Oversized Documents
If your PDF is still too large after compression, consider splitting it into smaller chunks. Many online tools and desktop apps let you divide a multi-page PDF into separate files. This is especially helpful for email attachments with strict size limits.
What Compression Level Should You Choose?
Most PDF compressors offer three presets:
- Low/Lossless: Minimal size reduction, zero quality loss. Best for legal documents or archives.
- Recommended/Balanced: 40–60% size reduction with no visible quality loss at normal zoom. Ideal for most use cases.
- Maximum/High Compression: Up to 80–90% reduction, but may introduce slight blurriness in images. Use only when size is the top priority.
Start with the balanced option and inspect the result. Zoom in on photos, charts, and small text to ensure everything still looks crisp. If it does, you’re good to go. If not, try a lower compression level.
Common Mistakes to Avoid
Even with the best tools, a few missteps can undermine your efforts.
Over-Compressing
It’s tempting to choose the highest compression setting to get the smallest file. But if images become pixelated or text looks fuzzy, you’ve gone too far. Always preview before sharing.
Ignoring Email Limits
Many email providers cap attachments at 20–25 MB. If your compressed PDF is still larger, consider using cloud storage links (Google Drive, Dropbox, OneDrive) instead of forcing further compression that hurts quality.
Forgetting to Check the Final File
After compression, open the PDF and scroll through it. Look for:
- Blurry images or logos
- Cut-off text or margins
- Missing pages or broken links
A quick quality check saves you from embarrassing mistakes later.
Mobile-Friendly Options
Need to compress PDF on your phone? Most online tools work directly in mobile browsers without requiring an app.
iPhone/iPad
- Open Safari or Chrome.
- Navigate to a PDF compressor like iLovePDF or NeatPDF.
- Upload from Files or Photos.
- Download the compressed version back to your device.
Android
- Open Chrome or your preferred browser.
- Visit a tool like Smallpdf or FreePDFConvert.
- Select your PDF from Google Drive or local storage.
- Save the result to Downloads or share directly.
Some apps also offer built-in compression. For example, Adobe Acrobat Reader for mobile includes a “Compress” feature in its premium version.
Security Considerations
When using online compressors, keep privacy in mind. Reputable tools delete files from their servers after processing (often within an hour), but sensitive documents may warrant extra caution.
Best Practices
- Use trusted tools: Stick with well-known services like iLovePDF, Smallpdf, or Adobe.
- Check privacy policies: Look for statements about automatic deletion and encryption.
- Consider offline tools: For highly confidential files, use desktop software like Acrobat Pro or Ghostscript to keep everything local.
Target File Sizes for Common Use Cases
Different scenarios call for different file sizes. Here’s a quick reference:
- Email attachments: Aim for under 5 MB to avoid bouncing or triggering spam filters.
- Web uploads: Many forms accept up to 10 MB, but smaller is always better for faster loading.
- Printing: Keep resolution at 300 DPI for professional results; file size matters less here.
- Archival storage: Prioritize quality over size; use lossless compression or keep original files.
If you’re unsure, start with the balanced compression preset and adjust based on your needs.
Troubleshooting Common Issues
“My PDF Is Still Too Large”
Try combining methods. For example, remove unnecessary pages first, then use an online compressor, and finally print to PDF with lower resolution. Each step chips away at the file size.
“Images Look Blurry After Compression”
You’ve likely chosen too aggressive a setting. Re-compress with a lower level or use a tool that lets you set a minimum DPI (150 is usually safe for screen viewing).
“The Tool Won’t Accept My File”
Check the file size limit. Some free tools cap uploads at 50–100 MB. For larger files, try desktop software or split the PDF into smaller sections first.
Final Thoughts
Reducing PDF file size without losing quality isn’t magic—it’s about choosing the right tool and applying smart optimization techniques. Whether you use a one-click online compressor, tweak export settings in your favorite app, or dive into command-line tools, the goal remains the same: smaller files, same clarity.
Start with the balanced compression preset, inspect the result, and adjust as needed. With a little practice, you’ll be able to shrink even the bulkiest PDFs into email-friendly, web-ready documents without sacrificing professionalism.
So the next time you’re staring at a 50 MB PDF that won’t upload, remember: you’ve got options. Compress PDF smartly, and you’ll save time, storage space, and a lot of frustration.